Step1 – Rough Opening Preparation
- Determine prior to installation what the actual finish floor height will be and adjust the rough opening (Existing wall opening at the Field) if needed.
- Ideal Rough Opening should be 1 inch wider than actual Unit Size (Net Outside Frame Size) and 1/2 inch taller.
- For typical wood frame construction, it is also essential that the wall sheathing be a solid surface to ensure that the unit can be secured firmly to the wall.
- Rough opening should be square within a tolerance of ¼”.
- The floor must be level with a tolerance of 1/8”.
- The header must be supported by trimmer studs.
- Minimum double studs should be used at all wood frame rough opening. A king and trimmer stud should be surrounding the door on both sides.
- The exterior face of the rough opening must be in a single plane with less than 1/8” twist from corner to corner (a True opening).
- The rough opening sill must not be crowned or sagged.
- Check the bottom surface of the opening to ensure it is flat, level, and free from debris. Proper operation of the door requires a sill that is flat and level.
Important: If these conditions are not met, the installer must take corrective actions to alter the opening(s) before proceeding.

Step 2 – Installing Door Frame – Single Front Door
- We always recommend installing the frame first followed by the slab. If your door unit arrives with the door slab installed, please remove the slab from the frame by unscrewing the hinges from the jamb.
- If the door slab is in the frame, make sure the door is supported so it does not swing open during installation.
- It is recommended to dry-fit the frame into the opening before applying any sealants.
- Apply a generous amount of Exterior Grade Silicone on the subfloor where threshold will sit. This prevents drafts and moisture from penetrating through the bottom. Ensure you are liberal with your sealants.
- Lean the pre-hung door into the rough opening.
- Start by shimming and aligning the bottom part of the jamb.
- Ensure correct daylight opening that will allow the door to close properly.
- We recommend placing this shim 2-3” from the subfloor.
- When installing strike side shims, ensure you prepare pilot holes for the fasteners on the strike side.
- To secure, we recommend inserting one shim at each of the following locations of the frame.
- Top corner (hinge side)
- Top corner (strike-plate side)
- Bottom corner (hinge side)
- Bottom corner (strike-plate-side)
- Behind each hinge (hinge side)
- Mirror hinge-shims on the strike-plate side
- Behind the strike plate (strike-plate side)
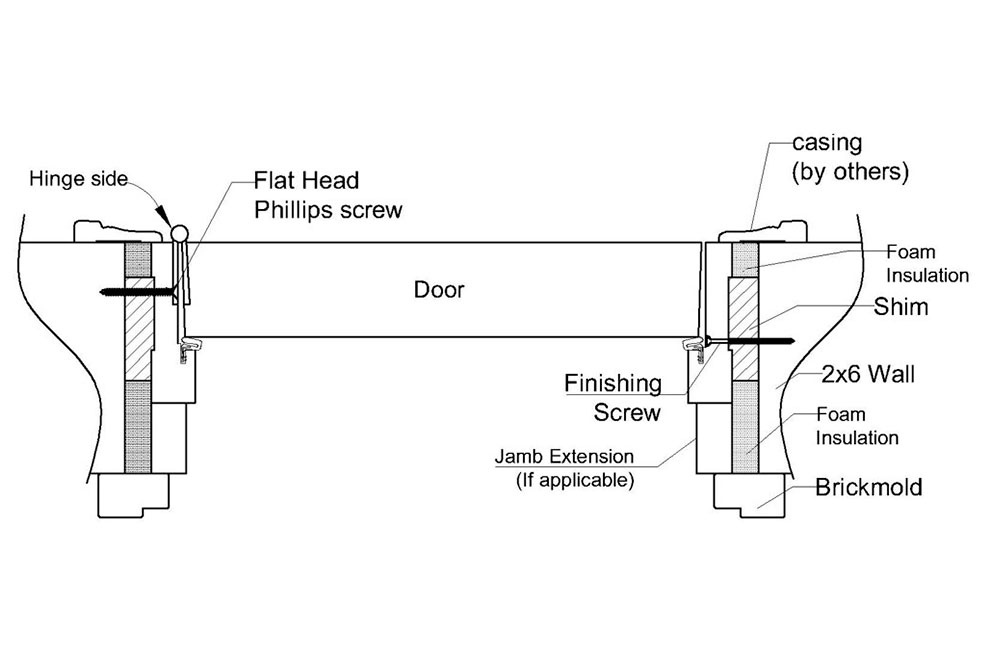
- Install finish screws through the jamb on the bottom, to hold the frame in place, approximately 2-3 inches from the bottom of the jamb.
- We always recommend predrilling the jamb, to avoid splitting the material.
- It is also the best practice to install the fasteners under the weatherstrip, to hide them from the sight.
- Align, plumb and shim the top hinge side of the frame and install the 3rd screw on the hinge side, under the weather strip. Remember to predrill the frame.
- With the frame in place, prepare to install the slab. Be aware the top strike side of the frame is loose at this moment to allow for adjustment and regulation.
- Install the slab using long 3” screw on the top hinge, going through the hinge, and at least 1 short screw per each remaining hinges.
- Close the door and inspect for:
- Gaps around the door between slab and frame
- If the door is in plumb and aligned with the wall
- Start shimming and fastening the frame on the top strike side of the frame.
- If adjustments are needed release the screw on one side and tighten on the other side. Add or remove shims as necessary.
- Install remaining long 3” screws, 1 per hinge, making sure to shim under the hinge and keep the gaps even.
- Verify the door unit is square and hinge side is plum.
- Test door to make sure the door closes tightly against weather stripping.
- Install 4 – 5 finishing screws on the strike side of the frame, under the weatherstrip.
Step 3- Post-Installation
- Adjust the threshold with a Phillips screwdriver. Use the screws to lift or lower the wooden raiser until there is even clearance on the bottom of the door. (this step does not apply for flat ADA thresholds)
- Insulate the space around the door by applying High-Grade Water-Resistant Insulation Foam (minimally expansive foam) between frame and rough opening.
- Finish installation by applying brickmould to the exterior side of the door with finishing nails.
- Minimize the appearance of finishing nails with a touch-up kit.
- Caulk around the doorway including the front sill edge and along the exterior where it meets the brick or siding.